Little shop.. Little shop of Haro

Last weekend marked the deadline for the Annual contest hosted by the admins over at ITSAGUNAAAAAAM!!!!!! on Facebook and once the votes were in I wound up in 1st place for my second time in the contest, go me! I was a little bit worried that I wouldn’t have made it since I’ve been head over heels at painting minis for DnD games as well as another project I will discuss soon. Congrats to all of the other participants, seriously, this years entries had some crazy efforts put into them and I was almost doubting my skills for a bit. Seeing as the other contestants are now starting to share their progress videos and progress pics I thought I might do something similar. Here is how I made my Haro Mimic that I entered for my third year in the Annual ITSAGUNDAAAAAAM!!!!!! contest.


Concept and Sculpting

I started off back in march by doing some basic sketches of what I thought was possible to make. My goal for this build was to challenge and familiarize myself with sculpting. I have only ever sculpted something advanced before but looked forward to applying it to the newly released Haro model from Bandai. I made sure to order a couple extras in case I did something horribly wrong but once it arrived I started cutting out the shape of the mouth as well as hollowing out the interior with a power tool in order to make room for the greenstuff I used as sculpting material.

gundam_little_shop_of_haro_mimic_custom_gunplawip_sculpting_05.jpg
Insert Pacman noise

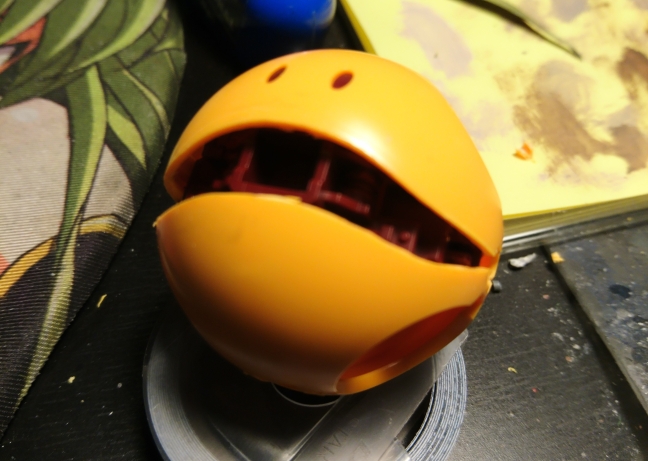
Once done I began with the general shapes and features such as lower gum of the mouth eyeballs and exposed muscles and mutation.

In order to smooth the transition between the plastic and putty I used a variations of tools such as silicon brushes dental tools and other, I continued adding details such as eyelids, more muscle mass and the full interior of the mouth.

Lastly I added the teeth and tongue which took me about 2 nights thanks to the greenstuff needing to cure. “Pro tip”, if you ever work with greenstuff on a stressed timeline. try looking into a greenstuff oven. Those things will more than half the greenstuff’s curing time.

Painting

Once everything had been sculpted and cured, I stared painting the interior with a dark fleshy, purple tone with several glazes of skin blended into the mix to highlight. As for the tongue I went with a more purple-isch than brown tone. once done I applied a super glossy glaze to give it a… moistened appearance. I later glued the two halves of the model together and filled any unwanted gaps that had appeared.

I gave the model a rusty undercoat using similar technique as in my salt & hairspray guide then I gave it the green base-coat starting from darkest bottom to the lightest top. The fleshy parts were glazed similarly to the inside of the mouth but given a bit of red shade just give it a more disgusting effect.

Somewhere along the line the base which was inspired by classical dark sci-fi corridors from games like dead space or the aliens movies.

Gundam_little_shop_of_Haro_Mimic_Custom_GunplaWIP_Sculpting_32

By then I thought i was done with the build, but one question haunted me.. is this gross and disgusting enough?.. Colors, check.  Peel the paint to expose the rust, check. Use GW Shade to further wear it down, check. it needed something.. more…

Enter the slime, oh the slime. Its amazing what an effect you can get using UHU Glue, toothpicks and some gloss glaze medium. Grab the toothpick, dip it in the glue and poke it between the areas you want the string of slime to appear.

Et viola! that’s how it was done. Hope this helps anyone curious on some of the details in the build. Gallery will soon be updated with the Haro Mimic.

Take care!


Commission Done, Raven Guard Force

I Finished these a while ago and uploaded to the gallery but I never wrote anything about it, so I thought it would be a good idea to share some highlights from the project All in all it was a good first time experience to paint models for someone else and I would gladly do it again if given the chance to do so. As the client (is that the right term?) wanted something just higher than standard table top standard with the bases quickly done and I think I delivered quite well on that promise.


Out of all the models I painted I think I had most fun with the commander in terminator armor and the Mor Deythan Squad. I think they look amazing with my level of painting on them and FW did an amazing sculpt on them.


That’s all for now dear reader. There’s a bunch of more pictures in the gallery folder so go have a look if you want. Cheers and have a lovely summer, I’m off to paint some more minis!

https://craftatorium.wordpress.com/completed-work/space-marine-raven-guard-commission/


Gear up, suit up, paint up!

Okay I’ve finally done it, I’ve entered my first modelling competition at a local modelling convention, same one I wasn’t able to go to last year and I just wanted to send in a quick post about it. The con is called C4-open, is supposedly is one of south Scandinavia’s largest modelling competitions and will as traditionally be hosted at the technical museum during the last weekend of October. From what I’ve gathered last year, you compete in many different categories, with the most prominent being classical scale models such as planes, tanks and similar with a small of classes dedicated for general sci-fi, miniatures and other figures. The latter is where I’ll most likely place most of my entries at and I’m currently in the process of adding and finalizing some additional models since you can bring as many models as you like and only be charged once for entry.
If things stay the same as last time they are about to get a 300-something % increase in mechas which will be quite interesting to see. I also have one smaller project underway which I’m unsure if I’ll be able to finish in time but you’ll never know.

What i’m currently bringing to the table is my Emeth, puchigguy and Medusa 4 chaos sorcerer, but as I said, might be able to squeeze in some more and I’m dead curious on how they will judge my painting and modelling skills, also there’s a lot of tools and paints I usually have no clue where to otherwise get.

Time is limited and I’ve got quite a few projects going as well so I will leave you here for now. Thanks once again for reading and stay awesome.
// Cogs

I don’t always complete a model, but when I do…

After spending a bit more then a year on my shelf I did the unthinkable and actually completed some models. In the past I’ve had some weird idea that doing proper highlights was way above my skill and effort. It might have been the fact that I did not have the tools, teaching or inspiration but during the latest couple of years I have slowly pushed myself out of such thinking and through sharing, asking and competing, I think I’m slowly progressing into a better painter.

Mostly I also try to test out one new method for every build that I make, aside from fun or relaxation builds. With that said, here are my 2 freshly finished battle suits with the addition of some proper pictures on my hammerhead gunship I did a while ago.

Descent Minis Update!!

It’s been a while and I have put painting most of them on hiatus but for now, I will update what I have.
All the hero characters with the inclusion of the Liutenant Ardus Ix’Erebus has been added to the descent NMM page on completed work. I have also added an additional page for all the monsters from descent. In the upcoming days I will continue to upload some work I’ve completed but not shared as well as some update to the page. see you in the next post 🙂

Progress update, so much warhammer.

During the course of 3 months now I have steadily going back towards hand-painting 25mm minis and such. part of it probably depends on the ease of just picking up a brush and start painting (compared to the need to clean and maintain an airbrush) as well as I haven’t really been able to afford gunpla in a while. Though it has certainly not been for naught since it has lead me to try out using glazes and mediums when painting. Further more to improve my hand-painting skill I have stated to get a better grip on highlighting edges and other.
here are some of the works I have done for the past 3 months: